
Knife Information
Double Bevel Knife Sharpening — How to Do it Right
Double Bevel Knife Sharpening
Double bevel knives are incredibly versatile. They are one of the most commonly found knives in commercial kitchens and home kitchens alike. If you have ever been knife shopping at a homewares store, you have most likely only seen double bevel knives.
Simply put, they have an asymmetrical edge when looking down the knife, and knives are most often called “50/50” grinds, meaning the edge of the blade is shaped like the tip of a triangle. Double bevel knives can be very easy to sharpen with the correct technique and lots of practice, and if you follow these steps you’ll be push-cutting newspaper in no time.
1) The right whetstones.
Choosing the right whetstone for the job is critical in ensuring a satisfactory result. Usually for most knives, maintenance can be done with a 1000 Grit Whetstone. A whetstone with this grit will slowly remove microchips, and can be used for maintenance on a regular basis.
To polish the edge for increased sharpness, a higher grit stone can be used. The most common polishing grit for most knives is a 6000 Grit stone. The most popular grit in combination stones (a stone composed of 2 faces of separate grits) is the 1000/6000 Grit stone. However, most soft generic stainless steels will not perform well above 3000 grit. This is because the more you polish the steel, the less “toothy” the edge becomes, as you lose the micro serrations left by coarser stones.
For a knife that has larger chips, a lower grit (coarser) stone must be used first, in order to abrade the steel much quicker. We recommend a 280 or 500 grit to start, then progress to the 1000 Grit after this. Once you have the correct stone, let's make sure it’s in the right condition.
2) A flat stone is a happy stone.
As we are going to be pushing our knife up and down the length of the stone, the stone needs to be flat to achieve an even edge. Over time, a stone will wear out in particular areas (called “dishing”) and needs to be returned to a flat state to be effective. A flat blade on a dished stone simply won’t sharpen up as well as a flat stone.
This can be done cheaply with sandpaper and a flat surface, or much easier and quicker using the Atoma or similar style “Lapping Plate”.
For a worn out stone, draw horizontal and vertical gridlines about an inch apart. Place this side of the stone on a flat surface, onto the abrasive side of some sandpaper and abrade until the lines disappear. Alternatively, wet the stone after drawing the lines, place on a flat surface with gridlines facing up, and rub with the Atoma Plate until the lines disappear.
Some stones require soaking before use. Check the instructions with your stone or ask your retailer. Most stones benefit from 10 minutes of soaking in water. Do not permanently soak your stones.
Now that your stone is flat and prepared, we’re ready to sharpen.
3) The Correct Grip
For easy sharpening, we want to use what’s called a “pinch grip”, with your thumb on the side of the blade towards the heel, a finger down the spine, and locking your wrist and hand in place.
4) The Correct Angle
There are several different ways to ascertain the best sharpening angle, and this can be done using some angle guide clips or angle wedges. These are intended as guides, and should not be used beyond giving you an indication of the best angles to use. To begin, most Japanese knives are best sharpened at around 14-15 degrees.
5) Let’s begin!
Using your free hand, press with 2 fingers towards the tip of the blade. Place the knife on the wet surface of your stone closest to you. You want firm pressure, but not so much pressure that you can’t sustain an even angle when sharpening. Push in a long, even, steady stroke to the end of the stone. On the release of pressure at the top of your stroke, slide the knife back towards you in the same position. It is important to lock your arm, wrist, and hand to ensure your blade stays at the same angle the entire way through your sharpening strokes.
Repeat this motion while slowly walking your fingers down the blade unti you reach the heel after around 20 strokes per side.
6) The Burr
Perhaps the most important part of sharpening any knife is feeling for the burr. As you sharpen, you wear steel off the blade and fold this edge over to the other side, forming a small lip that you can actually feel. See if you can feel this burr forming on the opposite side of the blade. If you can’t, keep going with your sharpening until you can feel a pronounced, even burr the entire length of the blade.
7) Repeat for the back side
Follow the above steps for your opposite hand. If you’re now sharpening on your non-preferred side, don’t worry! You’ll soon become comfortable with practice, learn to lock your wrist, arm and hand and take it slow.
8) Progressing through the grits
Once you’ve achieved a strong burr on the opposite side, make one stroke on your initial sharpening side, this will centre the burr. You can now move up to your next grit.
9) Polishing & Burr Removal
Repeat this step on your higher grit stones, using slightly less pressure. Polishing does not require much force. To remove the remainder of the burr from the blade, you can run in softly through some cork, newspaper, or pass it over denim.
You should now be the owner of a very sharp knife!
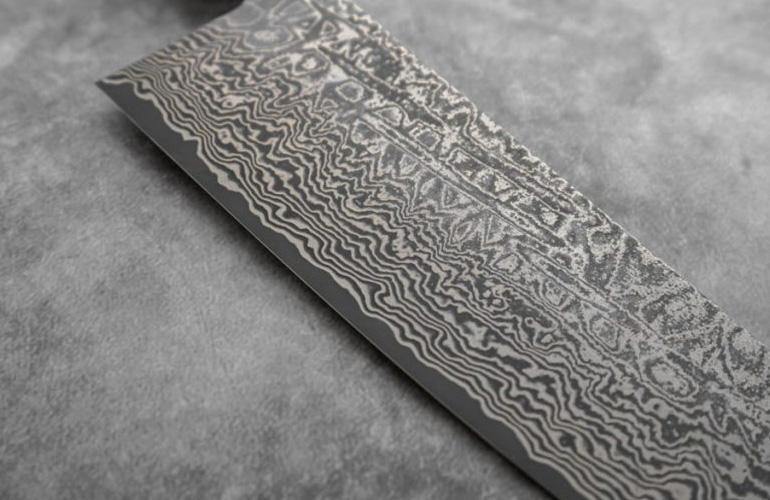
The use of Damascus Steel in kitchen knives can be somewhat of a polarising topic and poses several questions. Is there any real difference in performance between a Damascus Steel kitchen knife and regular steel kitchen knife? Is it all just for looks? Why are some Damascus kitchen knives so damn expensive and some are so cheap? Here we’ll answer these for you, sticking to the facts and giving you the information you need to make an informed decision about whether a Damascus Steel Kitchen knife may be right for you.
Origins/Types
The term ‘Damascus Steel’ can actually refer to several different types of end product, each utilising different methods and materials. Damascus Steel, Wootz Steel, and Pattern Weld all hold some overlap with each other, but all epitomise a product that is the result of multiple steels that have been forged or cast together using different methodologies then etched to bring out a unique layered finish.
The first iteration of what is referred to as the ‘original’ Damascus Steel in first arose in Middle-Eastern sword making, of which the original technique has been lost for may hundreds of years. This Damascus Steel weaponry was the result of forging Wootz steel, produced in India and traded to the Middle East. Tales of the stunning beauty, strength, and sharpness of the weapons produced spread throughout the world, but the process for making Wootz, the critical component of Damascus Steel, was lost in the 1700’s, and with it, there went the original iteration of Damascus Steel itself. It’s original form has never been replicated, even after the efforts of modern day science.
This presents the argument that any kitchen knife currently available labelled ‘Damascus Steel’ is technically misleading, as all ‘Damascus Steel’ at present time is the result of Pattern Welding several different alloys together which are then forged and re-welded then ‘etched’ with chemicals to produce a Damascus-like pattern. This etching process eats away a particular steel in the blade, leaving the other steel(s) untouched. This process is subject to much experimentation by pattern weld Damascus Steel makers around the world and through arranging the varying steels in specific ways, incredibly complex shapes can be produced on the blade of the knife.
Materials Used
So what is modern day Damascus Steel made from?
The truth is, just about any combination of stainless or alternating high or low carbon steel can be used, in combination with nickel alloys and even in some cases, items like scrap metal, screws, and bolts.
The arrangement of these steels is sketched out and planned as to ascertain the final appearance and then welded together, forged and drawn out, then folded or cut and the process is repeated to attain as many layers as desired.
While these pattern weld Damascus steels are similar in appearance to the first Damascus Steels produced, their internal composition is entirely different.
Some types of modern-day Damascus steel are manufactured by layering stainless steel, resulting in a more subtle pattern. This layered stainless is then ‘clad’ onto a core of harder, more wear-resistant higher carbon steel.
Damascus Steel Kitchen Knives produced using this technique are more expensive, as the time required produces a blade of far superior quality that is durable, but also looks fantastic.
This is a process that has been favoured more and more by Japanese Bladesmiths in recent times due to its fantastic edge retention from the hardness of the inner core, and also the durability due to the layers of more flexible and stain resistant stainless steel on the outside.
Which brings me to the question, “Is Damascus steel better than modern day steel? In terms of strength, and durability, there are modern exotic alloys that can far outperform pattern weld Damascus Steel.
Often, the core cutting edge of a knife is made from high carbon steel and clad with Damascus steel, such as the Yoshimi Kato SG2 Gyuto. It’s core is an exotic alloy, SG2 Powder Steel, and the cladding is alternating layers of stainless steel with added nickel, resulting in the Damascus steel appearance.
But that doesn’t mean that a well made Damascus Steel kitchen knife is of any less use to a professional chef or home cook than a non-Damascus Steel one.
The true appeal of Damascus Steel lies in its unique and exotic patterned finishes, and whether or not they look better than non-Damascus Kitchen knives is entirely subjective.
Just like anything, you get what you pay for. Damascus Steel made the right way requires an extraordinary level of attention to detail, experience, and precision, and it all comes at a price.
If it’s cheap, it ain’t good, and if it’s good, it ain’t cheap.
How to Make a Japanese Knife
Many people have a deep and entirely justifiable fascination with Japanese knives. Sharpness is part of the intrigue: learn more about the history of tameshigiri, if you want proof of the power of these blades.
There's also a fascinating background of how Japanese knives are made. A certain part of the forging process can only be performed after dark so that the blacksmith can better judge what color the metal is glowing — you've got to admit that's unique.
But aside from intrigue, people love the quality of these knives, thanks to how they're made. Here, we look at the process that Japanese knives are put through to obtain that incredible quality. Let's start with a breakdown of how they differ from Western knives.
What's the Difference Between Japanese Knives and Western Knives?
There are a few major differences between many Japanese knives and Western knives:
Single bevel (Japanese) vs. double bevel (Western): the single bevel means that a blade is better suited to one hand than the other and can hold a sharper edge for more delicate cuts
Harder, more brittle steel: Japanese knives tend to be made of harder steel. This is more brittle but holds an edge for longer if treated with respect.
Single-piece vs. composite handle: Western knives tend to have a handle made of two pieces of wood riveted together around the tang. In Japan, the tang is traditionally knocked into a single block of wood.
So, it's clear Western and Japanese knives are very different, but how are these blades made? There are numerous production modes, but we'll just look at two: the high-quality factory method and the mysterious, romantic hand-forged method.
How to Make a Japanese Knife in the Factory
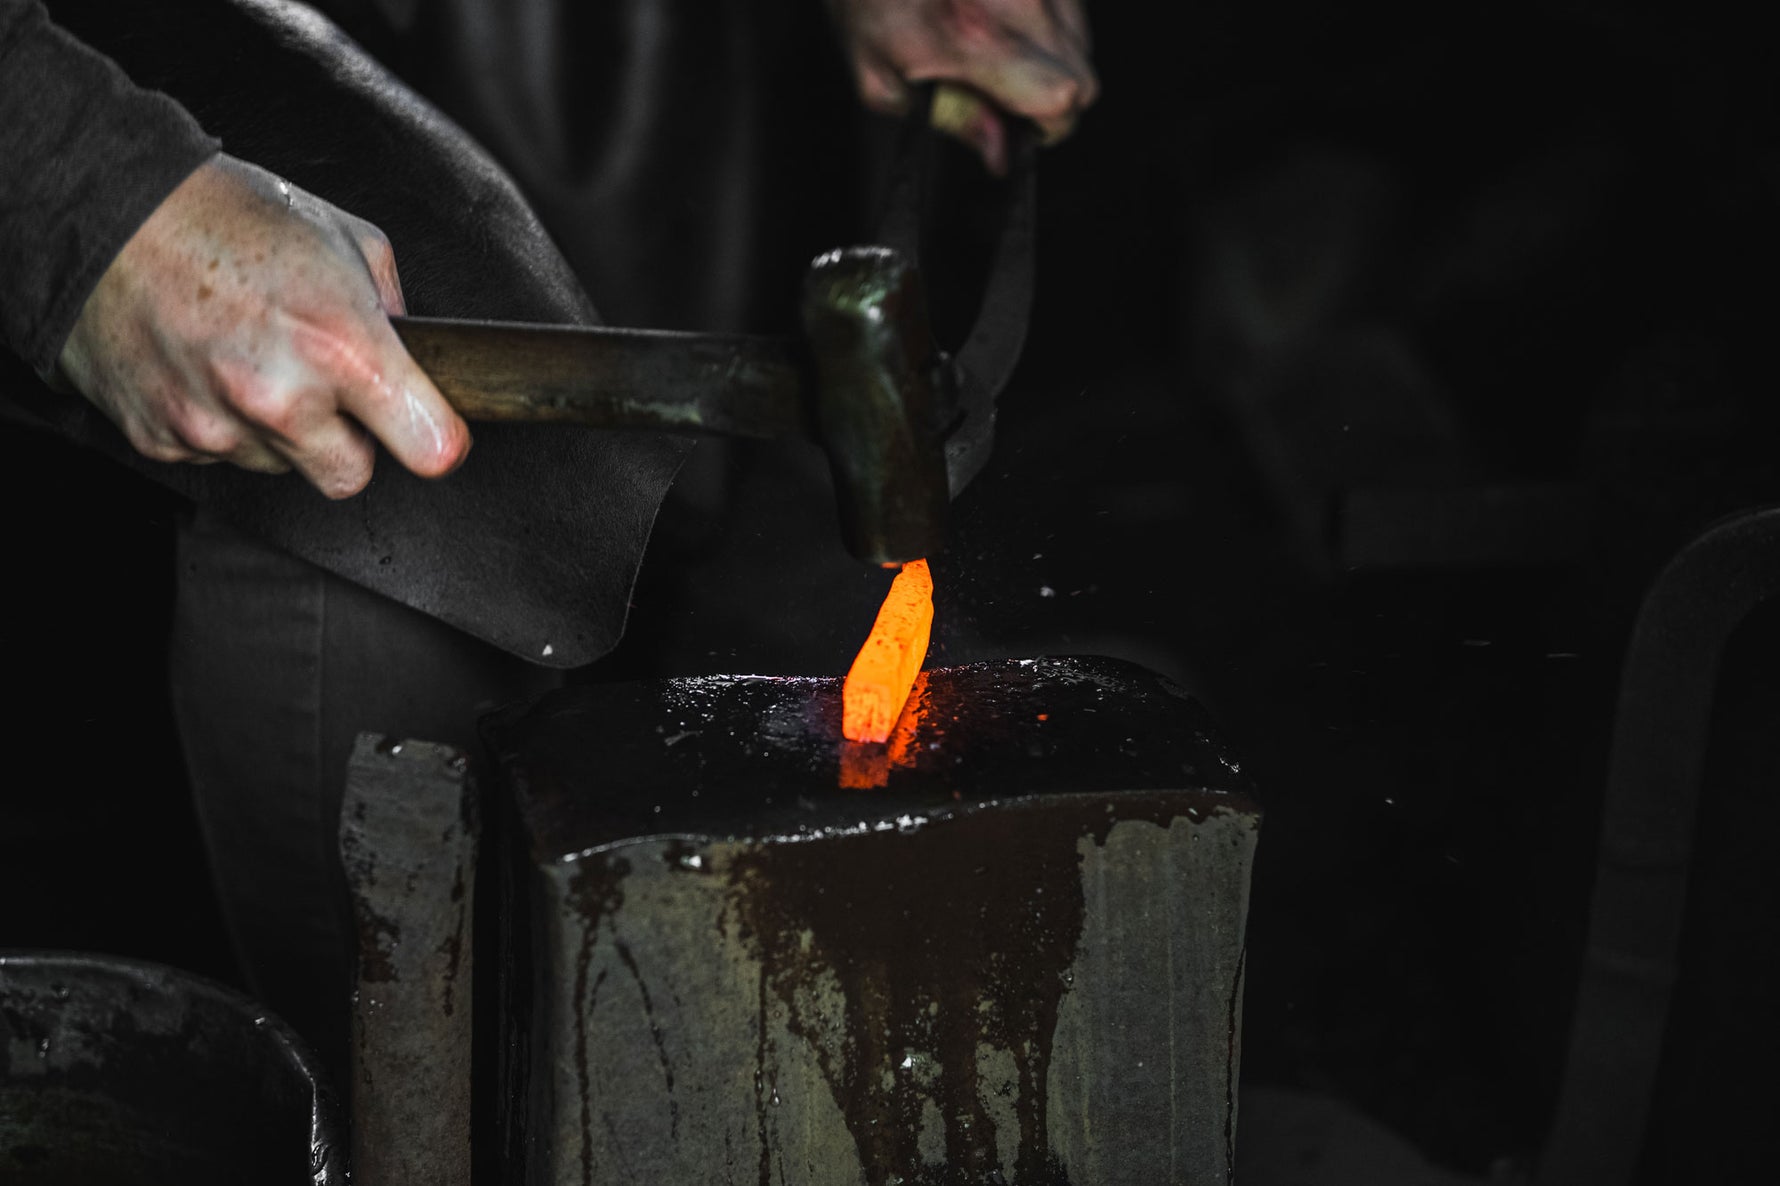
Rest assured that this isn't your typical ‘factory-made’ knife. There may be a team of workers and machinery, but the care that goes into forging these knives is still exquisite. It starts, of course, with the metal.
Step 1: Initial Shaping
Blanks of metal are heated in a forge and then pounded out with a power hammer. The metal is then periodically quenched to give it strength. This process leads to the blades taking on their basic form and achieve uniform strength in all parts.
At the end of the shaping, the blades are treated on a sanding belt. The shape of the blades is controlled and carefully monitored by expert craftspeople. As mentioned, this isn't your typical factory.
Step 2: The Kiln
The knives are put into a kiln and then cooled at a controlled pace a day after the initial shaping. The heating and cooling changes the metal's molecular structure to something approaching the desired result — but not quite. There's more work to be done on day 3.
Step 3: The Finished Shape
As the knives aren't yet at the final hardness, the final stage is to make some cold adjustments. This is an intensive, meticulous process done by hand. The knives are given their desired shape and then put through the kiln one more time, which gives them the perfect hardness.
Step 4: Sharpening
Sharpening a knife is a specialized job. The blades are sent to experts who sharpen the blades to an unbelievably fine grade. Even here, the temperature is key: the wheels that sharpen the blades are kept cool with water, as raising the metal to high temperatures would compromise its quality.
The knives produced using this method are sharper and of better quality than what you'll find in many restaurants. Here's what you wanted, though: the handmade method.
How to Make a Japanese Knife by Hand
Step 1: The Furnace
Masters in forging Japanese knives also start by heating metal in a furnace. So far, so familiar. Just like a great chef knows when a steak is perfectly medium-rare by touch, a master blacksmith knows when the metal is hot enough by its color, as well as other signals that the untrained eye just won't notice.
The metal is shaped with an air hammer and the watchful eye of the blacksmith. Precision is the key to perfection here, and not a single blow is wasted.
Step 2: Cold Forging
‘Cold forging’ means that the metal is, well, almost cold. This makes it far harder to work with than hot metal but yields far superior results. If you don't know what you're doing, it's easy to damage the metal by cold forging.
The blacksmith cold forges the knife to make the metal stronger on a molecular level than if it was hot forged. This job is sometimes given to a master craftsman's apprentice, which can seem an odd term for someone who already understands metalworking better than most mortals.
Step 3: Quenching
The blade is heated and then quenched to bring it to a desired level of hardness. Such is the need for perfection that it's important to use the right fuel for the furnace.
Coal, for example, contains a lot of impurities that make it unsuitable for this refined process. Think of your dad's bourbon-soaked hickory wood chips for his beloved barbecue, but on a whole different level.
The blacksmith knows instinctively what color the metal's glow has to be. This is why quenching only takes place after dark.
Step 4: Tempering
The blade must then be tempered to achieve the final, desired hardness. This takes place in carefully controlled temperature conditions and is essential before the blade can be sent off for sharpening.
Step 5: Creating a Legendary Edge
A top-quality, hand-forged knife deserves no less than the best to put an edge on it. A master knife sharpener is known as a togishi. This person's job is to put an edge on the blade that matches the quality of its construction.
A Labor of Love
Japanese knives are works of art in their own right. The care and years of training that go into producing a quality knife are formidable, and this is true of specialized factories and hand-crafted knives.
If you're interested in Japanese knives, something you might want to put on your bucket list is taking a tour of a workshop. Japanese knives also make wonderful gifts, as each one has a story behind it. Let your fascination take you further into this amazing world: ask any ‘apprentice.’ There's always more to learn!